PCem is different from other emulators in that when it starts up, reboots it’ll tear itself apart, and re-kick all the components. Normally other emulators do this once, and as a result I never noticed that slirp_exit doesn’t actually purge the socket state. And calling the socket teardown call causes a mbuf explosion in the code. Sadly GDB is pretty useless trying to debug it, since it’s claiming all the structure members don’t exist. Very strange.
Luckily I could duplicate the debug feature to go though current socket redirects, and close the sockets on the Windows side with a simple closesocket.
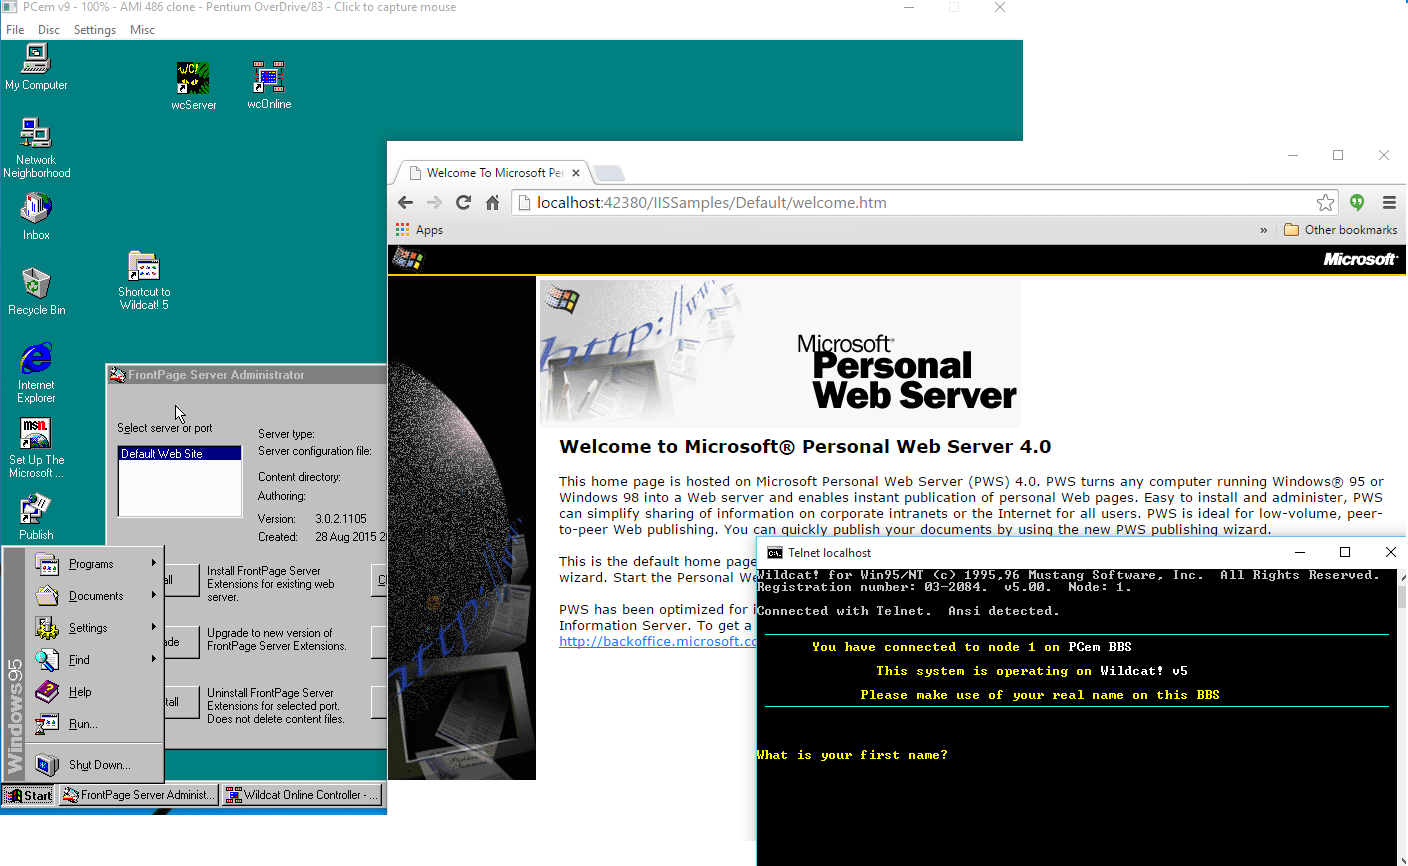
In this version I’ve setup the following TCP port redirects:
I still haven’t messed with the rc file, so there is no GUI config, instead you have to do it in the text files. I have some notes on the whole thing on the pcem forum here.
This includes more different core binaries, and mostly fixes the NE2000 to no longer panic and fault out when something dumb tries to probe it, by writing the wrong values in the wrong places.
For the curious build 334 is right here. We didn’t make the feature cut for version 10, so hopefully it’ll make 11. I’ll provide an unofficial build once v10 is announced, along with hopefully better networking back end modules, expanding things from pcap & SLiRP.
Well after extensive testing of various CFLAGS settings it turns out that “-O2 -flto -ffast-math -mfpmath=387” gives the best overall settings for PCem.
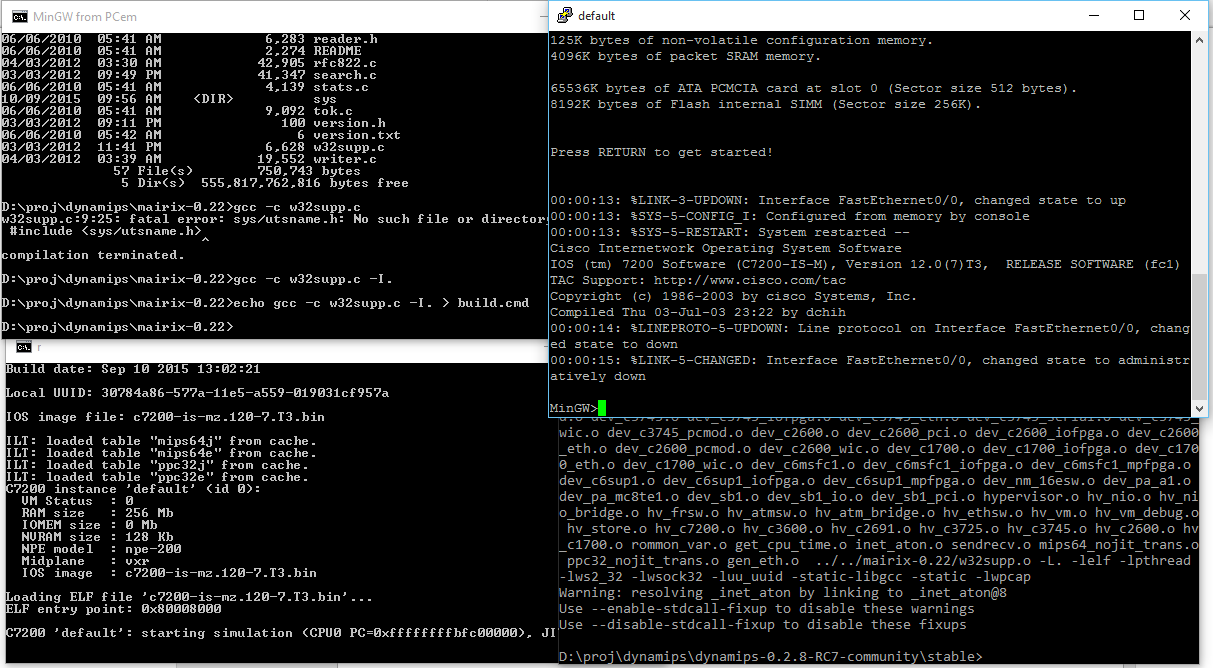
It’s always bugged me that the only way to build Dynamips for Windows was with Cygwin.
Well fear no more, I’ve mashed an old version (I would have tried newer, but of course Cmake fails spectacularly and with zero help as always!) and not only does it compile, but it can boot a 7200 version of IOS.
JIT is broken. You have to telnet into the console. And the console is a little wonkey as I’m sure it’s doing a lot more UNIX translation vs being a Win32 program but it does work enough to login, save the config, and reload.
I started with Dynamips 0.2.8-RC7-community and started commenting out stuff to get it to compile. Luckily I found this ezwinports that includes mairix that includes some memory mapping functions, namely mmap and munmap ported to Win32 in an early glibc port. While I was trying to integrate libuuid, I got this fun error:
mingw “error: conflicting types” “UUID”
MinGW includes UUID support, since it’s a Microsoft thing. Unfortunately libuuid doesn’t include unique names, so I had to rename uuid_t to uu_uuid_t
in the uuid.h header file, along with all instances in Dynamips.
I also borrowed sendmsg/recvmsg along with the msg structures from VLC. inetaton.c from WSHelper, and finally telnet.h from NetBSD.
After that it was a matter of making sure Winsock starts up, and fixing some linking breakage.
For those who want to try, the binary package is here. I’ll have to setup git on this machine and upload all the changes. It shouldn’t require any DLL’s, although I haven’t looked at the pcap stuff, as I mentioned it’s largely untested, so I have no idea if any of it works other than the telnet console.
So over in my work on porting Dynamips to MinGW, I’ve created a version of SLiRP that sends and receives data over UDP. In retrospect, something I should have done a long time ago, as it makes troubleshooting it easier as now if it were to crash it’s a stand alone program, so it won’t crash the emulator.
The good news is that I’ve been able to copy files into the virtual router using HTTP. I’ve even been able to access my OS/2 machine over FTP and load a file!
In addition, a 7200 with idle performs MUCH better than a 1700 without idle. There is something up with ptask, and only dispatching packets every so often. I’m guessing it’s done that way for a reason.
Also one other cool IOS trick I learned today is that you can redirect to a file resource! Say you want that ‘show tech-support’ as a file on the disk? No problem!
show tech-support | redirect disk0:tech.txt
And of course the newer versions of IOS have a ‘do’ command that you can run from config mode to execute user commands.
R1(config)#do who
Line User Host(s) Idle Location
* 0 con 0 idle 00:00:00
2 vty 0 idle 15:24:11 10.0.2.2
3 vty 1 idle 14:59:56 10.0.2.2
4 vty 2 idle 13:43:44 10.0.2.2
5 vty 3 idle 11:23:44 10.0.2.2
This will listen on port 20001, and send traffic to 127.0.0.1 on port 20000. Easy right?
Manually interfacing from the hypervisor can be the ‘fun’ part. I haven’t tested with any of the tools, as I don’t know if they will let you leave something ‘listening’ that isn’t connected. For my tests I end up building something with their UI, then loading up my hypervisor that logs, and seeing what it is actually doing so I can inject stuff like this:
This creates a udp nio, and attaches it onto the virtual etherswitch S1, and puts it on VLAN 1. As you can see it listens on UDP port 20000, which is where slirp_rdr is setup to send it’s data to, and it’ll send to 20001 where slirp_rdr is listening.
I’ve hard coded port 42323 to telnet into 10.0.2.15. As always SLiRP is hard coded to have the following ip address schema:
Gateway 10.0.2.2
DNS 10.0.2.3
Netmask 255.255.255.0
Be sure to set your router to 10.0.2.15/24 for this to work, and add 10.0.2.2 as your default gateway.
The ONLY address that will respond to ping is 10.0.2.2 . This is just the way SLiRP is. HTTP and TCP based stuff works best, things like PPTP will not. It’s really hit and miss, but the cool thing is that it doesn’t require any device drivers, it’s all user mode code!
This is a common scenario I see, where someone needs to get updates to some magical software package on the internet. Great. And people just give them access to ANY site, which ends up being not only the internet (the intended destination) but the rest of their internal network. Granted a good defense in the SDN world is inbound rules as well for each VM, but everything is never 100%.
RFC1918 defines our friends, the private address ranges:
However the solution to this fun filled problem is to grant them HTTP/HTTPS access to the inverse of this. Enter the netmask command. You can give it a range, and it’ll lay out what networks to you need to add like this:
Now I can exclude everything right up until 10.0.0.0/8 !
It’s quite the handy tool, but I didn’t see any Windows version. So a few minutes with MinGW, and dealing with it’s weird Makefile’s way of linking things, and here you go!
This way you can permit internet access, not give them inside, access and still have a global DENY actually work.
YAY.
And if anyone is interested here are the networks:
Well back in the day, before the hardware visualization craze of the 2000’s back in the dark days of 1999, there was UML, or better known as User Mode Linux. Sadly the freshmeat announcement is all but lost, but sourceforge is still with us so we have the archives.
UML, simply put is a Linux kernel that has been modified to run in user space. So to the OS, it is just another usermode program. Because it runs in user space, there is no kernel dependencies, or special hardware required, as UML is just a user program. Much in the way Qemu emulates a full machine, UML instead is the kernel process running with paravirtualized drivers so it should give overall a better/faster experience than hosting via Qemu. Keeping in mind that VMware was a 1.0 launch product in may of 1999, and Bochs was back from 1994.
So what happened to UML? The market was just too young to understand the power of hosted virtual machines, although there were some at the time. Overall the market was in the idea of large servers that could ‘share’ thousands of websites, and most people didn’t either want to run root in their own little world, or didn’t even know there were other options besides getting an entire physical box. I used to rent some UML VM out from a Canadian outfit back when I’d stream audio out on shoutcast, as I found my crappy connection at home couldn’t handle more than 5 listeners, but I could stream to the UML instance, and have it advertise out on shoutcast, and handle the 20-30 users I’d get back then. Now that we live in the gated walled world of corporate hosting, I don’t think most people would even imagine going through the hell of building their own hosting infrastructure.
So it’s 2016, who cares today?
Well this… ‘friend’ of a ‘friend’ bought what they thought was a dedicated machine in a one year contract. Except it turned out to be a KVM VM, with ‘dedicated’ processors to the instance. Ouch. They also got a bunch of ip addresses, but the idea of being able to run their web servers in VMs, along with an OpenVPN concentrator seemed to become an impossibility. Obviously user mode Qemu is an option but it would be far too slow. So I figured this would be a good time to use something from the past, UML.
So the ‘base’ host is running Debian 8.1. So the first thing to do is to install the 2 neeed packages for networking, the bridge & uml utilities.
One thing to keep in mind about UML, or x86 Linux in general is that you cannot mix a 64bit kernel with a 32bit userland, the 64 bit kernel can run 32bit executables and libraries, but it really needs a full 64bit userland. So from the UML page, to get going I went with the kernel linux-2.6.24-rc7.bz2 and an ancient copy of Debian 4.0 I found here.
Ok, now we want to add a bridge interface for this type of setup. The idea is that the UML’s will have ONLY an internal connection to the bridge, as the base machine owns all the physical addresses.
So it being Debian we modify the /etc/network/interfaces file to add:
The choice of 10.13.0.0/24 is 100% up to you. You can use any RFC 1918 address without any issues. Now I put this stuff in a script to fire up a UML host that will create my tap0 interface, bring it up, add it to the bridge, and fire up the UML. On termination it’ll remove the tap from the bridge, and delete the interface.
And once UML has booted up, a simple ifconfig can bring up the network, and I should be able to ping the bridge address
Debian GNU/Linux comes with ABSOLUTELY NO WARRANTY, to the extent
permitted by applicable law.
(none):~# ifconfig eth0 10.13.0.10 netmask 255.255.255.0
(none):~# ping 10.13.0.1
PING 10.13.0.1 (10.13.0.1) 56(84) bytes of data.
64 bytes from 10.13.0.1: icmp_seq=1 ttl=64 time=0.043 ms
64 bytes from 10.13.0.1: icmp_seq=2 ttl=64 time=0.067 ms
You get the idea.
Because I’m running some ancient debian root filesystem, I had to set the /etc/apt/sources to include the official archive to at least install things like ssh.
deb http://archive.debian.org/debian etch main
But that is pretty much that.
Now for the real fun part, putting it on the internet! I’ve found that this is a simple way to redirect in port 80 on the registered address I want to use, and it allows the UML instance to NAT out the same address.
Remember that you’ll also need to enable ipv4 forwarding for this to work! You’ll need to run:
sysctl -w net.ipv4.ip_forward=1
or add it to /etc/rc.local
And with all that done, the 32bit web server is now talking. It’s not what everyone was hoping for, but at least it’s a solution.
Well it was bound to happen sooner or later, but working on projects at the office I have segmented networks for various things, and the stuff I host only has to talk to one specific thing out on the internet. But things change, and flexibility is demanded as now I suddenly have half a dozen VPS’s out on the internet, that not only need to talk back to my office, but also need to talk to eachother. And of course adding that n+1 becomes tedious, and worse when one host goes down, and you have people pointing the wrong way. If only there was a solution…
And there is, as this ‘problem’ was solved forever ago with this magical thing called routing protocol. Before I was doing OpenVPN with a network to network type setup, but now I want to dynamically route, and considering it’s a small network, I’m free to use any protocol, even RIP is fine, as I have about 15 networks to advertise. In the end I went with BGP for really no real reason. RIP/OSPF,ISIS would have worked just as well.
The first thing is that to configure OpenVPN is that I didn’t want the normal ‘shared network’ setup, nor the tun style where OpenVPN intercepts the invalid destination address. While it does bring up links, and work for dynamic setups, I’m just bringing up static links that are point to point, and single host only. Also BGP wants the source and destination originating address to match, so a tunnel interface that is 10.0.1.6 10.0.1.5, but expects the destination to be 10.0.1.1 isn’t going to work. So I went with the old p2p style config.
Next setup the config for the ‘server’ side. In this case, each of my VPS’es is a server since they all have registered addresses, and don’t move as often. My office is going to move soon, and in the off even that I need to travel with my office setup it’s nice to bring it online wherever, and have it connect. At the same time if my office is down, this is why I want the VPSes to be able to talk to eachother.
Server config:
mode p2p
port 1194 #  We listen to port 1194
dev tun # possibly tun0 Linux
proto udp # protocol UDP, TCP: proto tcp-server

ifconfig 10.5.0.1 10.5.0.2 #  Local IP <-> Remote IP

# Here adjust the path to point to the generated Key
secret /etc/openvpn/static.key

ping 10 # Sends every 10 seconds a ping to the remote site
ping-restart # 180 after 3 minutes without pings reconnecting the remote
ping-timer-rem # only after we've let another peer ping-restart

verb 3 # increase to debugging
mute 50 # uncomment to debugging
Client config:
mode p2p
remote my-openvpn-server.dyndns.com 1194 # hostname / external IP of another peer, port accordingly
proto udp # protocol UDP, TCP: proto tcp-client
dev tun #  possibly tun0 Linux

ifconfig 10.5.0.2 10.5.0.1 #  Local IP <-> Remote IP

# Here adjust the path to point to the generated Key
secret /etc/openvpn/static.key

ping 10 # Sends every 10 seconds a ping to the remote site
ping-restart # 180 after 3 minutes without pings reconnecting the remote
ping-timer-rem # only after we've let another peer ping-restart

verb 3 # increase to debugging
mute 50 # uncomment to debugging
Now with the config’s in place, remembering to save with the filenames ‘server.conf’ and ‘client.conf’ in the /etc/openvpn directory, I was ready to restart the OpenVPN service (service openvpn restart) and now I could ping!
tun1 Link encap:UNSPEC HWaddr 00-00-00-00-00-00-00-00-00-00-00-00-00-00-00-00
inet addr:10.5.0.2 P-t-P:10.5.0.1 Mask:255.255.255.255
and a quick ping…
root@Office-OpenVPN:/etc/openvpn# ping 10.5.0.1
PING 10.5.2.1 (10.5.2.1) 56(84) bytes of data.
64 bytes from 10.5.0.1: icmp_req=1 ttl=64 time=1.66 ms
64 bytes from 10.5.0.1: icmp_req=2 ttl=64 time=3.39 ms
Now for the routing protocol. I went with quagga, as it is descended from zebra, and one that I’ve used before.
Configuration is pretty straight forward. first the daemons.conf file needs to be edited for what services you are going to run. In this case I want zebra & bgpd.
So now I’ve setup a p2p connection, and now defined the networks that I’m going to share from my office, in this case it’s 192.168.1.0/24, 10.1.0.0/24, and 10.1.1.0/24. The VPS is going to share it’s 10.13.0.0/24 network.
Now to start up the router with a ‘service quagga restart’ and all being well I can now talk to the BGPD.
telnet localhost 2605
Trying ::1…
Trying 127.0.0.1…
Connected to localhost.
Escape character is ‘^]’.
Hello, this is Quagga (version 0.99.22.4).
Copyright 1996-2005 Kunihiro Ishiguro, et al.
User Access Verification
Password:
office>
Now to check for my bgp neigbours
office> ena
office# show bgp neighbors
BGP neighbor is 10.5.0.1, remote AS 555, local AS 8888, external link
BGP version 4, remote router ID 127.0.0.2
BGP state = Established, up for 3d21h32m
Last read 00:00:33, hold time is 180, keepalive interval is 60 seconds
Neighbor capabilities:
4 Byte AS: advertised and received
Route refresh: advertised and received(old & new)
Address family IPv4 Unicast: advertised and received
Message statistics:
Inq depth is 0
Outq depth is 0
Sent Rcvd
Opens: 1 0
Notifications: 0 0
Updates: 18 1
Keepalives: 5613 5612
Route Refresh: 0 0
Capability: 0 0
Total: 5632 5613
Minimum time between advertisement runs is 30 seconds
For address family: IPv4 Unicast
Community attribute sent to this neighbor(both)
1 accepted prefixes
Connections established 1; dropped 0
Last reset never
Local host: 10.5.0.2, Local port: 179
Foreign host: 10.5.0.1, Foreign port: 35722
Nexthop: 10.5.0.2
Nexthop global: ::
Nexthop local: ::
BGP connection: non shared network
Read thread: on Write thread: off
office#
And how about the routes?
office# show ip bgp
BGP table version is 0, local router ID is 192.168.1.49
Status codes: s suppressed, d damped, h history, * valid, > best, i – internal,
r RIB-failure, S Stale, R Removed
Origin codes: i – IGP, e – EGP, ? – incomplete
Network Next Hop Metric LocPrf Weight Path
*> 10.1.0.0/24 0.0.0.0 0 32768 i
*> 10.1.1.0/24 0.0.0.0 0 32768 i
*> 10.13.0.0/24 10.5.13.1 0 0 555 i
*> 192.168.1.0 0.0.0.0 0 32768 i
Total number of prefixes 4
Well isn’t that great! For each additional connection on my client side, I change the client port. It doesn’t matter what number I choose as my client VPN machine isn’t exposed on the internet, only the OpenVPN servers on the VPSes. I can also combine this with a traditional OpenVPN setup where my clients get addresses on my Office Lan, and can now access all of my VPSes at once.
All I have left to do is define the additional servers into the mesh, and add in the BGP peers. And doing it this way two VPSes in the same data centre now have a 1ms ping, instead of traversing the internet to my office, and back up. Plus they can stay in communication if my office, or even their internet is down, as long as the internal communications of the data centre is fine.
injecting networking was no more difficult than it was in version 10. It’s only a few changes to pc.c, if you look at the USENETWORKING define you’ll see them. The best notes are on the forum.
I haven’t changed or improved anything it still requires manual configuration.
Downloads are available on my site as pcem_v11_networking.7z. You’ll have to defeat the password protection, as always. I included the source, it ought to be trivial to rebuild.
*For anyone using an old version the ‘nvr’ directory is missing, so PC-em is unable to create new non volatile ram save files, meaning you always loose your BIOS settings. Sorry I missed that one.
So my uh ‘friend’ that got into trouble when he found out that his ‘dedicated’ machine turned out to be a VM which he couldn’t launch nested KVM VM’s, and instead found that User Mode Linux (UML), would allow them to run their touchy ancient Linux application in a psudo VM/Container. Well they finally bit the bullet and decided to move to something better.
And by better, it was cheaper. And why was it cheaper? Because it is even a more restricted VM.
Great.
So naturally the panic call was made, because TUN/TAP networking was not permitted in this new VM. So what to do.
Well, keeping in mind how Qemu gets around this problem, it binds in a copy of SLiRP. And it turns out that UML can actually call SLiRP directly! So cool we have an ‘out’. First things first, we need SLiRP on the host machine. I’m old, so that means I build it from source.That means I’m downloading slirp-1.0.16.tar.gz, along with the 1.0.17 patch. I’m not sure if I need to go into how to extract source, patch, running configure and compiling.
One thing of note is that you really really really want to set the “FULL_BOLT” option either in the Makefile, or in config.h
With SLiRP built, I just copy it into /usr/local/bin .. I’m sure there is packages and stuff out there, but heh I’m old.
OK next up I make a small script to call SLiRP, in this case, I’m going to redirect port 80 directly into the VM. And for a test port 2323 which then goes into port 23 (why not ssh? .. sigh don’t go there).
I know this is what 99.99% of people hope I never do, but let’s make an incredibly insecure VPN! yay!
Motivation
So the thing is that I have a cisco router and I’d love for it to connect to some Windows machine over an existing OpenVPN, and NAT out the Windows side. Except for getting the VPN installed, they won’t give me anything else. And they SURE as heck won’t let me connect a cisco router up…..
So first things first, I need to configure my cisco router for an IPIP tunnel, to my test Windows machine, and use the SLiRP default addresses:
interface Tunnel0
description “SLiRP tunnel”
ip address 10.0.2.15 255.255.255.0
ip mtu 1452
tunnel source GigabitEthernet0/1
tunnel destination 192.168.1.10
tunnel mode ipip
end
Now to start programming.
Well then I went looking and found this fun filled page, about calling winioctl’s myself, and getting winsock to do all kinds of fun things. Namely how IPIP actually works, as it’s is it’s own protocol (none of that pesky TCP/UDP it’s IPIP!) and more importantly I can receive the traffic.
So looking at a quick UDP client/server I figured out that I can modify that so instead of listening with UDP like this:
One caveat I had on this, is that you need to run as Administrator on the Windows machine to create raw sockets. If you don’t have administrator privleges you’ll get this error:
Now add in some nonblocking, and feed the data into SLiRP, and I got invalid data! Using wireshark I can see that I only receive the IP portion of the data, so no hardware frame, but what is more interesting is that I receive ALL of the IP information so I get the IP+IP+DATA. So I have to forge a L2 header, and cut out the first IP header. I did this by cheating, using the following for a L2 header:
I then just memcpy that to the start of my buffer, then copy in the rest of the received data like this:
memcpy(buf2+14,buf+20,recv_len-20);
And now I can forge data going to SLiRP to make it happy!
And sending replies didn’t make wireshark happy at all, as there is an L2 header in there, that just doesn’t make sense in L3 space, so I trimmed that with the following:
memcpy(buf,qp->data+14,qp->len-14);
Putting it all together
And now much to my amazement I can ping SLiRP from my 7206!
One of the more cooler features of VMWare 5 is that it is capable of running itself. While it
may seem silly at first, this is a great way to build a virtual environment where you can test scripts for provisioning (and destroying) stuff, along with testing API level calls without having to worry about screwing up production, begging for a ‘lab’ environment, or even better snapshotting the whole thing so you can revert whatever it is you are doing at a block level. In short virtual datacenters really rock, especially for people like me who like to play in a really destructive manner.
So the first thing is that for this test I’m going to use a ‘freebie’ ESXi that I’ve been using for quite some time. Naturally this should work for version 6, but since the stuff that I’m testing is all in 5.0 and 5.5 (the majority being 5.5) I wan to build a 5.5 environment. In my insane scenario I have deployment access to a 2003 R2 x64 server with .net 2.0, and the majority of the environment I care about is VMWare ESX 5.5 along with vCenter. 5.5 on Windows 2008 servers. So trying to mirror this a bit, that means that I’m going to skip the new fangled appliance, I don’t know if it really matters for what I want, but for the sake of trying to keep things the same I’m going to match what I can.
I setup a generic ‘Other 2.6.x Linux (64-bit)’ VM, with a single socket, dual core processor, 4GB of RAM, a LSI SAS controller, with a 32GB disk, and 3 NIC’s with the VMXNET3 driver. For some reason I had to change the CPU to explicitly allow for hardware MMU emulation.
It’s also worth mentioning that when you are going to run ESXi on ESXi that any physical adapters that you want your virtual ESXi host to be able to lauch VMs and have them communicate onto you will need to enable the ‘Forged Transmits’ setting in the vSwitch properties.
With that in place, I was able to use my ESXi 5.5 ISO, and install into the VM. There isn’t much to really say the installer will install ESXi, and reboot and you get the console.
I went ahead and gave this ESXi server a static address, and that was pretty much it for the server.
Installing vCenter
I went ahead and used an eval copy of 2008 R2 that is available at Microsoft here. The installation is really simple, not much to say but for my needs I gave the VM a static address, HOWEVER I did NOT install Active Directory as you cannot install vCenter onto a DC, and I really was not in the mood to have a DC along with a vCenter 2008 VMs as I’m only interested in doing API testing I don’t care about authentication plugins I’m only concerned with other aspects. Obviously if you do care, then you’ll want to install 2 2008 servers. I gave my 2008 server a static address of 192.168.1.12 so that I could easily find it on the network post-install.
Since I have no imagination, I renamed the server “vcenter” which of course will factor into the login credentials later on.
I did the easy install, as again I’m not building a real enterprise. However I should point out that the easy install has a habit of popping alerts and prompts UNDER the current window so you could be waiting for quite a long long time for this to install when it really shouldn’t take all that long. I also kept the option for the 2008 Express edition as I’m not going to try to stress the count of VMs 50 is far more than I require as again I’m only interested in limited stuff at this point.
With all of that in place, I finally could use the web/flash site to login, using the local administrator account. However upon logging in the domain was barren, no vcenters no data centers, nothing.
You do not have permission to login to the server!
What? I don’t have permission?
A little digging around, and I found out of course, that it is because I don’t have an Active Directory, and that for ‘workgroup’ installs like this, you need to simply login as administrator@machine.local or ‘administrator@vsphere.local’ in my case, using the password that had to be set during the SSO installation.
So now I have a virtual vCenter, along with an ESXi host to deploy stuff onto, and destroy all I want. Even better VMWare Player & VMWare Fusion can also run ESXi nested, so you can take your virtual data-center with you on a laptop! You can boot 2008 with vCenter in 2GB of RAM, although it really should have 4GB if not more, and with 4GB for an ESXi server that would be 8GB+ on any laptop or desktop. However I’m lucky my ESXi server has 32GB of RAM, and my laptop has 16. So it’s also a great excuse to upgrade!
Well for the longest time there was no generally available way to emulate a cisco L2 switch. right before Dynamips was abandoned, in 0.28RC1, there was actually some work on the the Catalyst 6000 Supervisor 1 line card, although no interfaces are supported, and it was largely seen as impossible at the time.
While there may have been leaks of the internal IOU or IOS on UNIX, these are even more dubious than buying your own cisco 7200 and running that IOS on Dynamips. Indeed in the old days you’d no doubt find people with home labs that look something like this:
So yeah, I know it’s not new but it was new to me. But yes, VIRL is something us mere mortals can buy without a CCIE on hand, or a multi-million dollar contract on hand. Although it isn’t free, but compared to everything else cisco sells it’s cheap…
So VIRL comes in a few different flavors. They do have an ISO to run on bare metal x86 machines, OVAs for deployment on VMWare Workstation, and ESXi (Although for player you’ll have to get VIX and the vmnet config util from workstation, as I went through here & here).
Although that’s not so much what I’m interested in. As always I’m more interested in something that lets me run it on my own.
So as of today, the latest file is vios_l2-adventerprisek9-m.vmdk.SSA.152-4.0.55.E, with the MD5 checksum of 1a3a21f5697cae64bb930895b986d71e.
So as a first test, you can run the L2 image with Qemu/KVM! I found it works better renaming vios_l2-adventerprisek9-m.vmdk.SSA.152-4.0.55.E to vios_l2-adventerprisek9-m.vmdk.SSA.152-4.0.55.E.vmdk otherwise there was some issues with Qemu picking up the image.
The command line for a switch can be a little crazy so it’ll break some of it up onto separate lines. This way you can see that I bound a few interfaces to listen on UDP, while most of them are unbound, but you get the idea. Naturally it being a cisco product, it drives with a serial console.
Now, while I think it’s interesting to play with, but I know many people don’t like to setup and run a dozen programs manually, so how do we get this to run under GNS3!
As of right now the current version is 1.5.3, so let’s step through this real quick
However there is still a bunch of settings that still need to change. If you don’t make these changes you’ll have a switch with a single Ethernet port, and you will only be able to deploy a single switch, so that won’t be any fun!.
Once the wizard has finished you’ll be in the Preferences. Just hit edit, on the template we just added, or otherwise it’s under Edit->Preferences.
I’ve set the switch to 12 adapters. The default of 1 isn’t too useful. Next up hit the Advanced settings tab. Be sure to un-check the ‘Use as a linked base VM’ . This will let you deploy multiple copies. On Windows there is some weird issue where changes are seemingly not saved, so be sure to have a config backup strategy beyond saving the config locally.
Great, hit OK, and now we’ve got our L2 template for GNS3!
As a bonus, I put it on Linux, and it’ll run under KVM, however if you use the cisco downloaded files, you’ll see this error while booting:
-Traceback= 1DBB7C8z 8DBFE5z 90522Ez 904F50z 904D5Dz 900F45z 901B7Bz 901B0Fz 8D7C0Dz 8D7B0Dz 887061z 8BAE73z 8B9FD7z 8B7827z 8BCCC4z 8C0587z – Process “Async write process”, CPU hog, PC 0x008D7D62
Over and over, and it’ll be generally slow. For some reason KVM/Qemu on Linux is struggling with the VMDK. So the solution is to simply convert it from a VMWare VMDK into a Qcow2 image with:
So, in my fun and excitement I was putting together a ‘cisco’ network using dynamips that spans a few sites across the world. I’m using ancient copies of NT for some servers, although I plan on adding in some 386BSD, SunOS SPARC, and maybe even 68010 based, along with other stuff.
I have the routers running fine, but I felt like adding some kind of external authentication service, and TACACS certainly fits the bill! And to be all vintage as usual, I’m not going to use TACACS+ as it’s simply too new, and too big. So first things first, I need a copy of the source to TACACS as I’m certainly not going to write my own! I found this directory on ftp.funet.fi which has a bunch of old cisco related material, and sure enough there is a tacacsd.c
Even better it’s from 1989 which suits my need for something positively ancient, and simple enough to be a single C file.
/*
 * TACACS daemon suitable for using on Un*x systems.
 *
 * Janruary 1989, Greg Satz
 *
 * Copyright (c) 1989 by cisco Systems, Inc.
 * All rights reserved.
 */
Porting it to run on Winsock, really wasn’t all that hard, I had it running as a standalone program within a few minutes, however there is no password file in NT, so as a simple test, I had simply short circutied the username lookup to always suceeded, along with a password compare.
Since I have VMWare Player installed on my machine, I can use the VMNet 8 connection to talk to my host computer. The hard part of course is trying to figure out which NIC is which, but dynamips -e will give you a list like this:
Cisco Router Simulation Platform (version 0.2.16-experimental(merge uppc smips)Build-1-x86/MinGW stable)
Copyright (c) 2005-2011 Christophe Fillot.
Build date: Dec 15 2016 04:20:41

Pcap version [WinPcap version 4.1.3 (packet.dll version 4.1.0.2980), based on libpcap version 1.0 branch 1_0_rel0b (20091008)]
Network device list:

   \Device\NPF_{D3DF08C4-7A33-4FE2-9351-000153705A30} : VMware Virtual Ethernet Adapter
   \Device\NPF_{3FB194EF-F3A4-45F2-AFAB-A4ABA98E8FF7} : Qualcomm Atheros Ar81xx series PCI-E Ethernet Controller
   \Device\NPF_{C46B48B8-74E1-4938-9BFE-E407949A7940} : Microsoft
   \Device\NPF_{F72C65CD-C6BC-44FE-9019-C5057DB1D9AB} : VMware Virtual Ethernet Adapter
   \Device\NPF_{CE75B9C1-8189-4C8F-8EF6-6CEB0C6D0329} : Microsoft
   \Device\NPF_{737A8B62-9A87-4739-9CC2-BF05CDC315D0} : Microsoft
And with that information, we are good to go! Since I’m doing a simple test here, I don’t need anything other than a single ethernet to talk to my host, so here is a VERY simple cli to run dynamips:
Cisco Router Simulation Platform (version 0.2.16-experimental(merge uppc smips)Build-1-x86/MinGW stable)
Copyright (c) 2005-2011 Christophe Fillot.
Build date: Dec 15 2016 04:20:41

Pcap version [WinPcap version 4.1.3 (packet.dll version 4.1.0.2980), based on libpcap version 1.0 branch 1_0_rel0b (20091008)]
Idle PC set to 0x604f1da0.
IOS image file: ..\c7200-is-mz.19991126.bin

ILT: loaded table "mips64j" from cache.
ILT: loaded table "mips64e" from cache.
ILT: loaded table "ppc32j" from cache.
ILT: loaded table "ppc32e" from cache.
vtty_term_init
CPU0: carved JIT exec zone of 64 Mb into 2048 pages of 32 Kb.
C7200 instance 'default' (id 0):
  VM Status  : 0
  RAM size   : 256 Mb
  IOMEM size : 0 Mb
  NVRAM size : 128 Kb
  NPE model  : npe-200
  Midplane   : vxr
  IOS image  : ..\c7200-is-mz.19991126.bin

Loading ELF file '..\c7200-is-mz.19991126.bin'...
ELF entry point: 0x80008000

C7200 'default': starting simulation (CPU0 PC=0xffffffffbfc00000), JIT enabled.
mips64_test.s ROMMON emulation microcode.

mips64_test.s Launching IOS image at 0x80008000...
Self decompressing the image : ####()## [OK]

              Restricted Rights Legend

Use, duplication, or disclosure by the Government is
subject to restrictions as set forth in subparagraph
(c) of the Commercial Computer Software - Restricted
Rights clause at FAR sec. 52.227-19 and subparagraph
(c) (1) (ii) of the Rights in Technical Data and Computer
Software clause at DFARS sec. 252.227-7013.

           cisco Systems, Inc.
           170 West Tasman Drive
           San Jose, California 95134-1706

Cisco Internetwork Operating System Software
IOS (tm) 7200 Software (C7200-IS-M), Experimental Version 12.0(20000110:181554) [otroan-thanksgiving-rel 175]
Copyright (c) 1986-2000 by cisco Systems, Inc.
Compiled Thu 20-Jan-00 15:07 by otroan
Image text-base: 0x60008900, data-base: 0x613D0000

cisco 7206VXR (NPE200) processor with 253952K/8192K bytes of memory.
R5000 CPU at 200Mhz, Implementation 35, Rev 1.2
6 slot VXR midplane, Version 2.1

Last reset from power-on
Bridging software.
X.25 software, Version 3.0.0.
1 FastEthernet/IEEE 802.3 interface(s)
125K bytes of non-volatile configuration memory.
4096K bytes of packet SRAM memory.

65536K bytes of ATA PCMCIA card at slot 0 (Sector size 512 bytes).
8192K bytes of Flash internal SIMM (Sector size 256K).

         --- System Configuration Dialog ---

Would you like to enter the initial configuration dialog? [yes/no]: no

Press RETURN to get started!
Next I need to take note of how VMWare & Windows have configured my VMNet8 adapter, and configure the router accordingly:
So Im using 192.168.254.1/24 so let’s setup the router. Let’s give it a .10 for the heck of it. Also I’m going to turn off DNS name resolution for the moment.
00:00:02: %DEC21140-3-DUPLEX_SPEED: FastEthernet0/0 doesn't support the configured duplexand speed combination
00:00:02: %DEC21140-3-DUPLEX_SPEED: FastEthernet0/0 doesn't support the configured duplexand speed combination
00:00:02: %DEC21140-3-DUPLEX_SPEED: FastEthernet0/0 doesn't support the configured duplexand speed combination
00:00:32: %LINK-5-CHANGED: Interface FastEthernet0/0, changed state to administratively down
00:00:32: %SYS-5-RESTART: System restarted --
Cisco Internetwork Operating Sys
Router>
Router>tem Software
IOS (tm) 7200 Software (C7200-IS-M), Experimental Version 12.0(20000110:181554) [otroan-thanksgiving-rel 175]
Copyright (c) 1986-2000 by cisco Systems, Inc.
Compiled Thu 20-Jan-00 15:07 by otroan
00:00:33: %LINEPROTO-5-UPDOWN: Line protocol on Interface FastEthernet0/0, changed state to down
Router>ena
Router#config t
Enter configuration commands, one per line.  End with CNTL/Z.
Router(config)#int fa0/0
Router(config-if)#ip address 192.168.254.10 255.255.255.0
Router(config-if)#no shut
Router(config-if)#exit
Router(config)#ip route 0.0.0.0 0.0.0.0 192.168.254.1
00:01:29: %DEC21140-3-DUPLEX_SPEED: FastEthernet0/0 doesn't support the configured duplexand speed combination
00:01:31: %LINK-3-UPDOWN: Interface FastEthernet0/0, changed state to up
00:01:32: %LINEPROTO-5-UPDOWN: Line protocol on Interface FastEthernet0/0, changed state to up
Router(config)#no ip domain-lookup
Router(config)#exit
Router#wr
Building configuration...
[OK]
Router#
00:01:39: %SYS-5-CONFIG_I: Configured from console by console
And if everything is going well, I can now ping from Windows!
Microsoft Windows [Version 10.0.14393]
(c) 2016 Microsoft Corporation. All rights reserved.

C:\Users\neozeed>ping 192.168.254.10

Pinging 192.168.254.10 with 32 bytes of data:
Reply from 192.168.254.10: bytes=32 time=54ms TTL=255
Reply from 192.168.254.10: bytes=32 time=31ms TTL=255
Reply from 192.168.254.10: bytes=32 time=31ms TTL=255
Reply from 192.168.254.10: bytes=32 time=31ms TTL=255

Ping statistics for 192.168.254.10:
    Packets: Sent = 4, Received = 4, Lost = 0 (0% loss),
Approximate round trip times in milli-seconds:
    Minimum = 31ms, Maximum = 54ms, Average = 36ms

C:\Users\neozeed>
Awesome! Pinging from the cisco however fails.
Router#ping 192.168.254.1

Type escape sequence to abort.
Sending 5, 100-byte ICMP Echos to 192.168.254.1, timeout is 2 seconds:
.....
Success rate is 0 percent (0/5)
This fails as Windows by default has it’s firewall on, which then blocks all incoming traffic. However to see that the ICMP would have succeded, you can look at the arp table, and the .1 address should have been learned:
Router#show arp
Protocol  Address          Age (min)  Hardware Addr   Type   Interface
Internet  192.168.254.1           0   0050.56c0.0008  ARPA   FastEthernet0/0
Internet  192.168.254.10          -   ca00.3730.0000  ARPA   FastEthernet0/0
We can either diable the firewall, or we can add a rule to permit ICMP. To do either you need to go to the firewall control panel in Windows. In this quick example, I’m going to build a rule using the firewall control pannel.
Now we can select the scope of the rule, in this case we are going to allow the 192.168.254.0/24 network to pass icmp traffic to us. Add it as a source and destination.
In this quick example I’m applying it everywhere. I suppose a better setup would be to make sure the VMNet 8 adapter is a ‘Private’ network, and ONLY apply this to the Private domain.
Then give it a name, something like ‘ICMP for VMnet8’
Router#ping 192.168.254.1

Type escape sequence to abort.
Sending 5, 100-byte ICMP Echos to 192.168.254.1, timeout is 2 seconds:
!!!!!
Success rate is 100 percent (5/5), round-trip min/avg/max = 20/30/36 ms
And now we can ping!
Now for the fun, I go ahead and compile my hacked up tacacsd.c, and run it, and then permit it to run on all networks:
And now I can configure the router to use TACACS. Keep in mind, once gain that this is *NOT* TACACS+ so this is done a little differently. I’m going to simply set TACACS for telnet connections.
Router#config t
Enter configuration commands, one per line.  End with CNTL/Z.
Router(config)#tacacs-server host 192.168.254.1
Router(config)#line vty 0 4
Router(config-line)#login tacacs
Router(config-line)#exit
Router(config)#enable password 0 cisco
Router(config)#exit
Router#wr
Building configuration...
[OK]
Router#
00:01:28: %SYS-5-CONFIG_I: Configured from console by console
And now I’m ready to test!
User Access Verification

Username: user
Password:
Router>who
    Line       User       Host(s)              Idle       Location
   0 con 0                idle                 00:01:11
*  2 vty 0     user       idle                 00:00:00 192.168.254.1

  Interface  User      Mode                     Idle Peer Address

Router>
As you can see I logged in as ‘user’ … and keep in mind my TACACS simply permits anything. As for what tacacsd runs by default:
D:\dynamips\tacacs>tacacsd.exe
server starting
using port 12544
validation request from 192.168.254.10
query for user (pw->pw_gecos) accepted
It’s not exciting, but as you can see it is attempting to look through the gecos to verify the user, but in this case I just allow anything. And besides just granting anyone the ability to login, let’s take a look on the wire:
Needless to say this is something that you would NEVER EVER EVER run in a real network. Of course a system that sits on telnet is vulnerable anyways, but I suppose a TACACS server that lets anyone log in, makes either a VERY trusting network, or a good honeypot. Against my better judgement, here is tacacsd_win32.c Naturally it could be easily made to verify passwords against pretty much anything.
So yeah, let’s build a NetWare 3.12 server! I’ve covered this over and over and over, but heh let’s do it again!
First things first, the default position of the NE2000 card at 0x300/IRQ 9 does NOT WORK. This is the biggest stumbling block, and time waster right there. I loaded a PCnet driver, and it didn’t lock, but it didn’t work. I loaded 2 ne2000’s thinking the second would come up in the correct position but that didn’t work either. The solution of course is to dive into the parameters for QEMU to drive devices.
So for the fun of it, here is how I’m going to run this in a nested VM. It’s also why I didn’t bother enabling the ‘-enable-kvm’ flag. Although on a real machine I would.
So the key portion here is the iobase & irq. This let’s me sidestep the IRQ 9, port 0x300 issue. Talking to the monitor and running ‘info qtree’ I’m able to look at the parameters that I can pass the network card:
bus: isa.0
type ISA
dev: ne2k_isa, id ""
  iobase = 800 (0x320)
  irq = 11 (0xb)
  mac = "00:2e:3c:92:11:01"
  vlan =
  netdev = "lan"
  isa irq 11
As you can see there is actually a few further things I could have set, but the key ones here being the iobase, the irq, the mac address, and then assigning it to a netdev, in this case I then bind it to a VDE.
Now the fun part goes back to the old days of Netware when your network could run several possible frame times. If you have 2 machines with different frames, they will not see each-other. it was a cheap way to hide networks well until the wide spread availability of sniffers. Naturally cisco and Novell have different terms for the same things. Below are the ones that are relevant to Ethernet:
Frame Types
Novell
cisco
ETHERNET_802.3
novell-ether
ETHERNET_802.2
sap
ETHERNET_Snap
snap
ETHERNET_II
arpa
So in my case on my Netware server I simply load my NE2000 like this:
LOAD NE2000 PORT=320 INT=A FRAME=ETHERNET_802.3
BIND IPX TO NE2000 NET=800852
HKOffice#sho ipx servers
Codes: S - Static, P - Periodic, E - EIGRP, N - NLSP, H - Holddown, + = detail
U - Per-user static
1 Total IPX Servers

Table ordering is based on routing and server info

Type Name Net Address Port Route Hops Itf
P 4 HONGKONG 852.0000.0000.0001:0451 2/01 1 Fa0/0
HKOffice#
NetWare servers advertise their internal networks, much like how people should be using loopback adapters in OSPF, or EIGRP … So if you check the IPX routing table, you’ll see the wire route to the internal network:
HKOffice#sho ipx route
Codes: C - Connected primary network, c - Connected secondary network
S - Static, F - Floating static, L - Local (internal), W - IPXWAN
R - RIP, E - EIGRP, N - NLSP, X - External, A - Aggregate
s - seconds, u - uses, U - Per-user static/Unknown, H - Hold-down

2 Total IPX routes. Up to 1 parallel paths and 16 hops allowed.

No default route known.

C 800852 (NOVELL-ETHER), Fa0/0
R 852 [02/01] via 800852.002e.3c92.1101, 150s, Fa0/0
Just like that!
One thing to note, on VDE, I had an issue where the NetWare server takes about a minute before it’ll see traffic. It could be my IOS for all I know…..
I found this fun page over on retroweb.maclab.org What is interesting is that it encorporates PeerJS and WebRTC to allow for a virtual network, letting you play multiplayer AppleTalk. Just enable the network, and scan for other users.
injecting networking was no more difficult than it was in version 10. It’s only a few changes to pc.c, if you look at the USENETWORKING define you’ll see them. The best notes are on the forum.
I haven’t changed or improved anything it still requires manual configuration.
Downloads are available on my site as pcem_v11_networking.7z. You’ll have to defeat the password protection, as always. I included the source, it ought to be trivial to rebuild.
*For anyone using an old version the ‘nvr’ directory is missing, so PC-em is unable to create new non volatile ram save files, meaning you always loose your BIOS settings. Sorry I missed that one.
So my uh ‘friend’ that got into trouble when he found out that his ‘dedicated’ machine turned out to be a VM which he couldn’t launch nested KVM VM’s, and instead found that User Mode Linux (UML), would allow them to run their touchy ancient Linux application in a psudo VM/Container. Well they finally bit the bullet and decided to move to something better.
And by better, it was cheaper. And why was it cheaper? Because it is even a more restricted VM.
Great.
So naturally the panic call was made, because TUN/TAP networking was not permitted in this new VM. So what to do.
Well, keeping in mind how Qemu gets around this problem, it binds in a copy of SLiRP. And it turns out that UML can actually call SLiRP directly! So cool we have an ‘out’. First things first, we need SLiRP on the host machine. I’m old, so that means I build it from source.That means I’m downloading slirp-1.0.16.tar.gz, along with the 1.0.17 patch. I’m not sure if I need to go into how to extract source, patch, running configure and compiling.
One thing of note is that you really really really want to set the “FULL_BOLT” option either in the Makefile, or in config.h
With SLiRP built, I just copy it into /usr/local/bin .. I’m sure there is packages and stuff out there, but heh I’m old.
OK next up I make a small script to call SLiRP, in this case, I’m going to redirect port 80 directly into the VM. And for a test port 2323 which then goes into port 23 (why not ssh? .. sigh don’t go there).
I know this is what 99.99% of people hope I never do, but let’s make an incredibly insecure VPN! yay!
Motivation
So the thing is that I have a cisco router and I’d love for it to connect to some Windows machine over an existing OpenVPN, and NAT out the Windows side. Except for getting the VPN installed, they won’t give me anything else. And they SURE as heck won’t let me connect a cisco router up…..
So first things first, I need to configure my cisco router for an IPIP tunnel, to my test Windows machine, and use the SLiRP default addresses:
interface Tunnel0
description “SLiRP tunnel”
ip address 10.0.2.15 255.255.255.0
ip mtu 1452
tunnel source GigabitEthernet0/1
tunnel destination 192.168.1.10
tunnel mode ipip
end
Now to start programming.
Well then I went looking and found this fun filled page, about calling winioctl’s myself, and getting winsock to do all kinds of fun things. Namely how IPIP actually works, as it’s is it’s own protocol (none of that pesky TCP/UDP it’s IPIP!) and more importantly I can receive the traffic.
So looking at a quick UDP client/server I figured out that I can modify that so instead of listening with UDP like this:
One caveat I had on this, is that you need to run as Administrator on the Windows machine to create raw sockets. If you don’t have administrator privleges you’ll get this error:
Now add in some nonblocking, and feed the data into SLiRP, and I got invalid data! Using wireshark I can see that I only receive the IP portion of the data, so no hardware frame, but what is more interesting is that I receive ALL of the IP information so I get the IP+IP+DATA. So I have to forge a L2 header, and cut out the first IP header. I did this by cheating, using the following for a L2 header:
I then just memcpy that to the start of my buffer, then copy in the rest of the received data like this:
memcpy(buf2+14,buf+20,recv_len-20);
And now I can forge data going to SLiRP to make it happy!
And sending replies didn’t make wireshark happy at all, as there is an L2 header in there, that just doesn’t make sense in L3 space, so I trimmed that with the following:
memcpy(buf,qp->data+14,qp->len-14);
Putting it all together
And now much to my amazement I can ping SLiRP from my 7206!